
Your brake wear sensor just lit up, so you swap the pads and carry on. Simple enough for a standard road car running OEM compounds. Bolt on a set of performance or motorsport-spec pads, however, and that same workflow becomes a liability.
Performance compounds operate at higher temperatures, wear non-linearly, and behave in ways that factory-calibrated electronic sensors were never designed to interpret. The result is a false sense of security: your warning light stays dark while the actual brake pad thickness has already dropped into dangerous territory, or it triggers prematurely and sends you chasing a problem that does not yet exist. Either scenario carries real consequences, from accelerated disc damage to sudden, unwarned brake fade mid-corner.
This tutorial walks you through the tools and techniques that racing and performance applications actually rely on. You will learn how to use a brake pad thickness gauge for direct measurement, how to interpret sensor warnings on uprated compounds, how to spot heat-related wear patterns that visual checks cannot reveal, and how to build a monitoring routine calibrated to track, street, and mixed-use demands. Stop guessing; start measuring.
Why Electronic Wear Sensors Fall Short on Performance Compounds
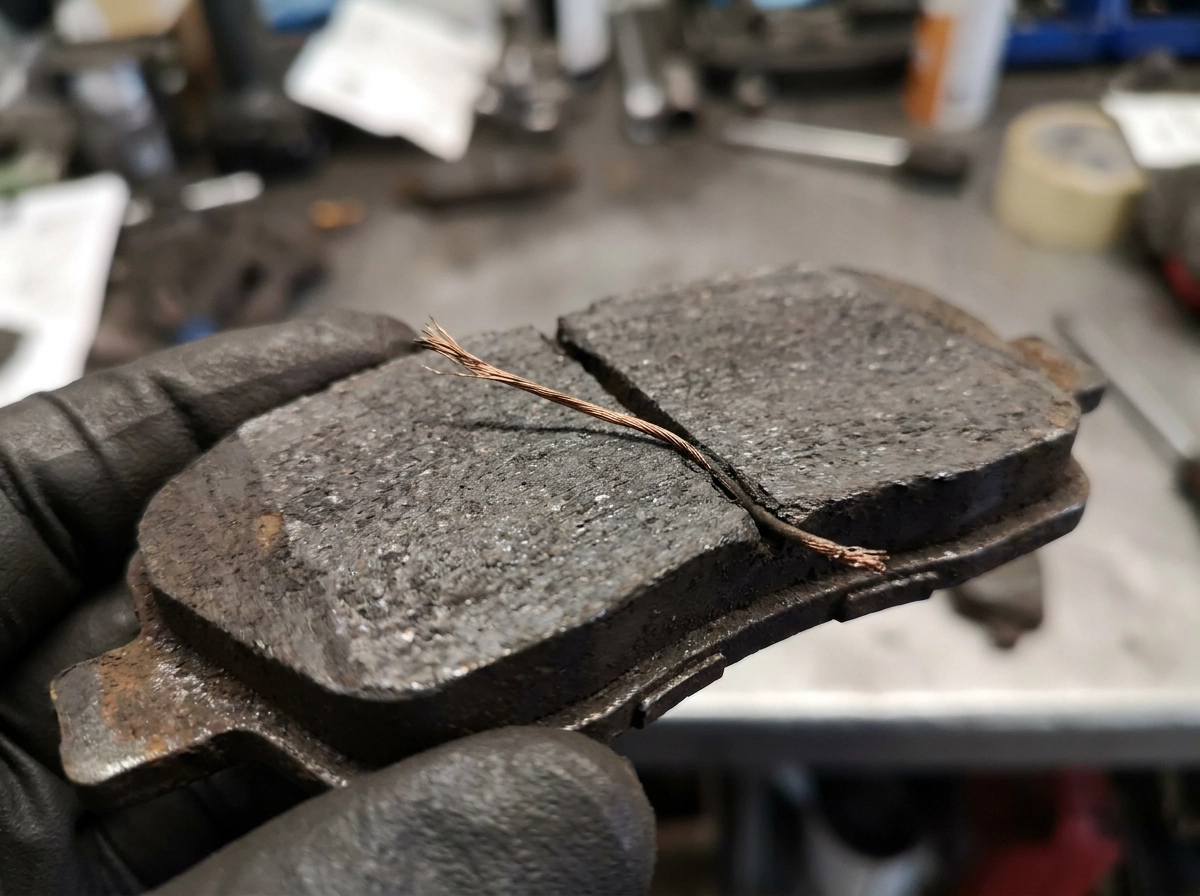
OEM brake pad sensors are engineered around a specific assumption: that the pad wearing down to the sensor wire’s depth represents a predictable, consistent depletion of friction material. That assumption holds reasonably well for standard compound pads on a car used as the manufacturer intended. It does not hold for uprated performance and motorsport compounds.
The core problem is thermal. Performance compounds are engineered to withstand far higher operating temperatures than standard OEM pads. Under track conditions or sustained aggressive driving, those elevated temperatures do not simply accelerate wear at a uniform rate. They can alter the wear pattern in ways that standard linear wear assumptions do not account for. The sensor’s embedded wire sits at a fixed depth; it cannot detect how the material above it has degraded or redistributed.
When the wire finally contacts the rotor and triggers the dashboard warning, it is reporting geometry, not condition. In practice, a performance pad that has experienced repeated high-temperature cycles may have far less usable friction material remaining than its physical thickness implies, which is why direct measurement rather than sensor reliance is recommended. Structural integrity of the compound can be compromised well before the sensor fires.
The result is a dangerous gap in information. A driver relying solely on the brake pad sensor warning light gets no graduated signal, no early indication, and no account of heat-induced degradation. The light either stays off or it does not, and by the time it activates, the pad may already be past a safe working threshold.
This is not a minor calibration offset. It is a structural mismatch between what the sensor was designed to measure and how performance brake pad compounds actually behave in use. Treating the warning light as your primary monitoring method on an uprated braking system is, in practice, delegating a safety-critical decision to a tool built for a completely different application.
The Brake Pad Thickness Gauge: Direct Measurement Over Assumptions
The solution to that structural mismatch is direct measurement. A brake pad thickness gauge gives you the actual remaining friction material depth in millimetres, reading the pad itself rather than inferring its condition from an embedded wire. There is no calibration assumption, no thermal offset, no guesswork.
Where a visual check through the wheel spokes gives you an approximate impression of pad bulk, a gauge gives you a precise figure at multiple points across the pad face. That distinction matters because performance pads under hard use frequently develop tapered or uneven wear, thicker at one end than the other, or deeper at the centre than the edges. A single glance cannot quantify that. A gauge used at three or more positions across the same pad can.
Gauge formats worth knowing:
- Slide-type gauges are compact and quick to use at trackside; they suit checks between sessions where speed matters.
- Dial-type gauges suit workshop inspections where a deliberate, documented check is the goal.
Both formats are now widely available through mainstream retail channels, which reflects growing awareness that direct measurement is worthwhile. However, availability does not mean every gauge is appropriate for every application. Performance pad compounds can start thicker than OEM parts, so choose a gauge with a measurement range that covers both the new thickness and the minimum replacement threshold of your specific compound. A gauge that only reads to 20 mm is useless on a pad that starts at 28 mm.
Industry professionals treat the brake lining thickness gauge as a precision safety instrument, not an optional convenience. For anyone running uprated compounds, it should be considered standard equipment. For a broader foundation on brake system selection, the complete guide to brake discs and pads for performance cars covers compound types and how they affect monitoring requirements.
How to Use a Brake Pad Gauge: Step-by-Step for Performance Applications
With the right gauge in hand, technique determines whether your readings are reliable or misleading.
Step 1: Let the brakes cool completely. Performance compounds retain heat significantly longer than OEM pads. Measuring a thermally expanded pad will understate wear, giving you a falsely reassuring number. After a track session or hard road drive, allow the brakes to cool fully before measuring, this may take considerably longer than it would with standard pads.
Step 2: Position the gauge correctly. With the wheel removed or via a suitable inspection gap, place the gauge feet squarely on the friction material surface. Contacting the backing plate instead of the compound itself is a common error that inflates your reading and defeats the measurement entirely.
Step 3: Measure at three points minimum. Take readings at the inboard edge, centre, and outboard edge of each pad, leaving one edge noticeably thinner than the other in ways a single central measurement will not reveal. Three points reveal taper wear that a lone reading conceals.
Step 4: Compare against manufacturer specifications. Record every measurement and check it against the pad supplier’s stated minimum thickness. If no minimum is published, the racing community standard is to replace at approximately 50% of original thickness. This threshold exists to prevent caliper piston over-extension, which causes misalignment and inconsistent pedal feel. Refer to the guidance on Performance Brake Upgrades UK: Brake Pads, Discs & Big Brake Kits Explained for compound-specific context.
Step 5: Consider front-to-rear rotation at 30%. If your front pads remain above the replacement threshold but have worn to roughly 30% of their original brake pad thickness, rotating them to the rear axle is an established motorsport practice. Rear brakes generate less heat and see lower braking forces, so the remaining compound can be used safely without risking the front circuit.
Finally, keep a written log. Record each measurement against mileage or session number. Brake pad lifespan on a performance compound can collapse between two track days in ways that equivalent street mileage would never reveal. A log makes that pattern visible before it becomes dangerous.
Reading Brake Pad Sensor Warnings When You Are Running Uprated Compounds
Once your gauge log is established, you need to understand how the sensor fits into that picture, because on a performance-equipped car, the brake pad sensor and the gauge are not telling you the same thing.
Treat any sensor warning as a prompt to measure immediately, not as confirmation that replacement is now due. With a performance compound, the sensor may trigger late relative to actual pad condition. By the time the warning light appears, usable material could already be below a safe threshold. Reach for the gauge before drawing any conclusion.
Some performance pad fitments are not designed to accept the OEM sensor, either due to backing plate geometry or the manufacturer’s expectation that scheduled gauge checks replace sensor monitoring. If your sensor has been removed, that is not inherently unsafe, but it places the entire responsibility on your measurement routine.
Where the sensor remains installed alongside an uprated compound, its trigger depth may not match the original calibration. Where a performance pad’s total thickness differs from the OEM part, the sensor’s trigger point in the wear cycle may shift accordingly. The warning could arrive earlier or later than designed.
If the sensor activates and your gauge confirms thickness is still above the 50% threshold, do not dismiss the warning without further inspection. Sensors can detect abnormal rotor contact caused by a warped or uneven pad face rather than depth alone. This is the same principle behind other dashboard alerts; just as understanding what an engine oil warning light actually means prevents misdiagnosis, treating a brake sensor warning as a prompt rather than a verdict protects you from incorrect action in either direction.
Set a fixed manual check interval independent of the sensor. For road use, a regular gauge check at each service interval or more frequently is the appropriate cadence for performance compounds. For track use, measure before and after every event without exception.
Recognising Heat-Related Wear Patterns That Visual Checks Miss
Even when your gauge readings and sensor behaviour look acceptable, the friction surface itself can tell a different story.
Heat checking appears as a fine network of surface cracks across the pad face, indicating that the compound has been thermally stressed. Structural integrity is reduced even if material thickness remains, and a heat-checked pad is not the same pad it was before that stress occurred.
Glazing is identifiable by a shiny, glassy appearance on the friction surface. Repeated overheating can harden or partially transform the surface compound, reducing its grip characteristics. A glazed pad can produce fade at temperatures and loads it previously handled without issue, and thickness measurements alone will not reveal this. If the surface reflects light like polished metal, the pad needs attention regardless of how many millimetres remain.
Taper wear means the pad is measurably thicker at one end than the other. Measure at both ends and the centre on every inspection, as a single central reading will not reveal this.
Delamination risk is an additional concern as pads thin under repeated thermal cycling. The 50% replacement threshold helps keep sufficient material in place to reduce this risk alongside its primary purpose of preventing caliper piston over-extension.
Significant discolouration on the backing plate, particularly dark bluing, can indicate that operating temperatures have exceeded the compound’s normal working range, though the exact threshold varies by compound.
How Often to Replace Performance Pads: Track, Street, and Mixed Use
Even with heat-related wear patterns identified and addressed, knowing when to act on your measurements requires a separate framework, because brake pad lifespan on a performance compound cannot be meaningfully expressed in miles alone.
A single hard track day can consume a substantial portion of pad life, far more than an equivalent period of road driving. That single data point makes mileage-based replacement intervals redundant for any driver who takes their car on circuit, even occasionally. Without a gauge reading, a mileage figure tells you very little about what is actually left.
Dedicated track and motorsport use: Measure pad thickness before every event, without exception. Apply the thresholds established earlier in this guide. A pre-event check also confirms that any wear accelerated by the previous session has not brought you below threshold overnight.
Road use with occasional spirited driving: A gauge check at each service interval, or more frequently if the car sees any spirited road use, provides adequate monitoring for this usage pattern. Do not use the brake pad sensor warning as your trigger to check; by the time it activates, a performance compound may already be past a safe working depth.
Mixed-use drivers running the same pads to and from a track day face the most unpredictable wear profile. Treat the post-event gauge check as your primary data point, not the pre-event one. A single session may have consumed a disproportionate share of remaining life, and the return road drive home compounds that.
Replacing pads before they reach critical depth also protects your discs. Metal-to-metal contact can score a performance rotor, converting a straightforward pad replacement into a considerably more expensive brake disc replacement as well.
Building this kind of systematic maintenance habit applies across your car, not just the brakes. Just as you would check your engine oil correctly to avoid costly damage, scheduled gauge checks keep your braking system honest regardless of what the sensors say.
Build a Monitoring Routine Your Sensors Cannot Replace
The intervals and thresholds covered above only protect you if one thing is already in place: a routine that runs on your schedule, not the car’s warning system.
OEM wear sensors are a last-resort alert built around standard compound behaviour. On uprated pads, that calibration does not hold. A brake pad thickness gauge is the tool that replaces assumption with data, giving you millimetre readings at multiple points across the pad face as detailed in the measurement steps above.
Apply the 50%/30% thresholds detailed earlier in this guide, and inspect for heat damage at every measurement regardless of the numbers: glazing, heat checking, or significant backing plate discolouration signals degradation that thickness alone cannot communicate.
Build your cadence around usage, not warning lights: before and after every track day, and at each service interval or roughly every few thousand miles for road use. Log each set of readings with the date and session count. Over time, that written record will show you exactly how your specific compound wears under your driving conditions, making the next replacement decision straightforward rather than speculative.
For everything needed to put this into practice, browse performance brake upgrades and supporting tools at performancecarsparts.co.uk, covering pads suited to both road and track applications.
Conclusion
Performance braking demands more than passive monitoring. Electronic wear sensors are calibrated for standard compounds, not the high-temperature friction materials your upgraded setup actually uses. A brake pad thickness gauge delivers real measurements at multiple points, exposing uneven wear and heat damage before either becomes a safety issue. Your replacement decisions should follow compound-specific thresholds and a consistent logging routine, not a dashboard warning that may never illuminate until it is too late.
The drivers who get the most from their performance pads are those who treat measurement as a habit rather than a reaction. Check before and after every track session, record every reading, and let the data guide your timing.
If you are ready to match your monitoring approach to the quality of your setup, explore performance brake pads and supporting tools at performancecarsparts.co.uk and take full control of your stopping power.