Most fast track cars do not need bigger discs; they need better fluid, pads and airflow. Fit a big brake kit too early and you spend heavily for a change you cannot yet feel, while adding unsprung mass and creating fitment problems you did not have before. The real decision is not disc diameter. It is measured wheel clearance, brake caliper choice and how you actually use the car.
This guide treats the upgrade as a measured purchase, not a styling one. We will compare four pot and six pot calipers, including monobloc construction, explain what a floating two piece disc changes, and work through pad sweep and pad choice. We will then cover disc sizing as a trade of thermal mass against unsprung weight, before showing you how to check clearance behind your existing wheels. A worked spacer and offset example will make the arithmetic concrete, and we will finish on MOT, insurance and resale consequences for non standard brakes. Performance Cars Parts supplies brakes, suspension and wheel upgrades online, with email and WhatsApp support for fitment questions.
Why a Big Brake Kit Is Usually the Fourth Thing You Buy
Before you price a caliper, treat the brake system as a sequence. First, fresh brake fluid with a high dry boiling point and a thorough bleed. On track, fluid is the cheapest change that alters pedal feel and consistency, for a fraction of kit cost. A pedal that lengthens before the pads fade usually points to fluid degradation or air, not caliper piston count.
Second, fit a track pad compound with a temperature window that matches your sessions, then bed it in correctly. Compound is the biggest single lever on friction and disc wear, and the cheapest to change. Most fade complaints blamed on calipers start with a road pad outside its thermal range or one that was never bedded.
Third, address cooling. Ducting, backing plates or a simple deflector can lower disc and caliper temperatures enough to stop fade on a standard setup, and because it is reversible you can test it without committing to hardware. A modest cooling change often buys the session length an owner wanted from a kit.
Then fix the cheap constraints: glazed or below minimum thickness discs, a dragging or seizing caliper, tired flexi lines, tyre choice and driver technique all cap braking performance before a bigger caliper does. If you are planning wider upgrades, our guide to performance parts that transform your car puts brakes in context with suspension and engine work.
The honest position is that a big brake kit buys thermal capacity and repeatability over a session, not more single stop braking force. If you cannot fade your current brakes across a full session, you are buying headroom you may never use. Start with fluid, pads and cooling, then measure wheel clearance before spending.
Brake Caliper Types: Four Pot, Six Pot and Monobloc Compared
If fluid, pads and cooling have not solved your fade, caliper choice is the next constraint, not the first. A caliper exists to clamp the pad evenly and repeatedly, hot or cold. Piston count is the marketing headline; total piston area, pad area, caliper stiffness and mounting method drive pedal feel and pad wear. Total area is π × (piston diameter ÷ 2)² summed across pistons, and it must stay close to the original or pedal travel and bias shift. The relationship between caliper piston area and master cylinder bore is what decides whether the pedal stays firm or goes long.
Four pot calipers suit most 300 to 330 mm track setups on road legal tyres. They are lighter than an equivalent six pot, take cheaper pads, usually clear wheels better and are quicker to change on many designs. They are stiff enough for track days unless you run slicks for long sessions. Six pots spread clamp force over a longer pad, which helps control taper and modulation on heavier or faster cars. The catch is hydraulic ratio: if total piston area is much greater than standard, you get a long pedal and unintended front bias. Match area to master cylinder bore rather than buying by piston count.
Monobloc versus bolted: a monobloc caliper is one machined body, so it flexes less under load and is often lighter than a bolted design of similar stiffness. A two piece bolted caliper can be cheaper and easier to rebuild. Neither is automatically better; stiffness and serviceability trade against price.
Fitment decides whether a caliper is even an option. Check disc thickness the body accepts, radial mount bolt spacing and lug height, caliper offset relative to disc centreline, and whether your upright needs machining or an adapter bracket. If you are still choosing discs and pads, our guide to brake discs and pads covers compounds and bedding in before you commit. Once a caliper passes those checks, disc construction and sizing become the next decision.
Floating vs Fixed Discs: What a Two Piece Rotor Really Changes
Caliper mounting and piston area decide clamp force. Disc construction decides what happens to that force under heat.
A fixed one piece disc is a single casting, with rotor and mounting flange joined. It is cheap, almost certainly what your car already runs, and needs no servicing. The limitation is that the iron cannot relieve thermal expansion. Uneven heating causes coning, the distortion linked to judder and disc thickness variation, and the one piece design carries more mass at the hub.
A two piece fixed disc bolts an iron rotor to an aluminium bell with solid mounts. You save weight at the hub and can replace just the rotor when it wears, but the solid mounting still restrains axial expansion, so coning remains possible.
A floating disc, often semi floating, locates the rotor on bobbins or spring washers. The rotor can expand radially and axially, which reduces coning and hot judder. That is why floating discs are common on serious track kits. Fully floating discs run the rotor free on drive pins for the best distortion resistance. The cost is a light rattle at low speed and bobbins that wear and need servicing as a consumable.
Weight is the quiet argument for two piece and floating designs. A lighter bell and mounting hardware can save several kilograms per corner against a one piece disc of the same diameter. Rotor mass is both unsprung and rotating, so that saving affects ride, steering response and acceleration more than the same weight removed from the chassis. If you are replacing just the rotor, the friction face still needs choosing: our guide to performance brake discs explained covers grooved, drilled and dimpled patterns and their trade offs.
Disc Sizing: Thermal Mass Against Unsprung Weight
With construction settled, size is where the arithmetic matters. Diameter changes torque through leverage: brake torque equals clamp force times pad friction coefficient times effective radius. A larger disc gives more torque from the same caliper and pads, which changes pedal effort and balance, not just stopping power.
Fade resistance is thermal mass. Heat capacity across disc, pad and caliper sets how many hard stops it takes to reach fade temperature; repeated-stop simulations show cumulative heat, not one stop, is the driver. A bigger disc mainly adds mass and surface area, buying time over a session rather than transforming a single stop.
The cost is mass at the corner. Unsprung weight hurts ride, steering response and acceleration more than the same mass in the chassis, and rotating mass costs again. Save it where the brake system allows: lighter bells, calipers and mounting hardware.
Swept area is not braking force. Pad coefficient of friction multiplied by clamp force multiplied by effective radius is the calculation that matters. Drilled or slotted faces mainly manage gas, water and pad glazing, and over-drilled discs can crack.
The hard limit is the wheel. A 356 mm disc needs the caliper bridge to sit inside your wheel’s barrel, so check internal barrel diameter, spoke profile, hub PCD, centre bore and disc thickness before choosing between 330 mm and something larger. Compare brake discs against those measurements, not the other way round.
Pad Sweep and Pad Choice: The Disc Life Question
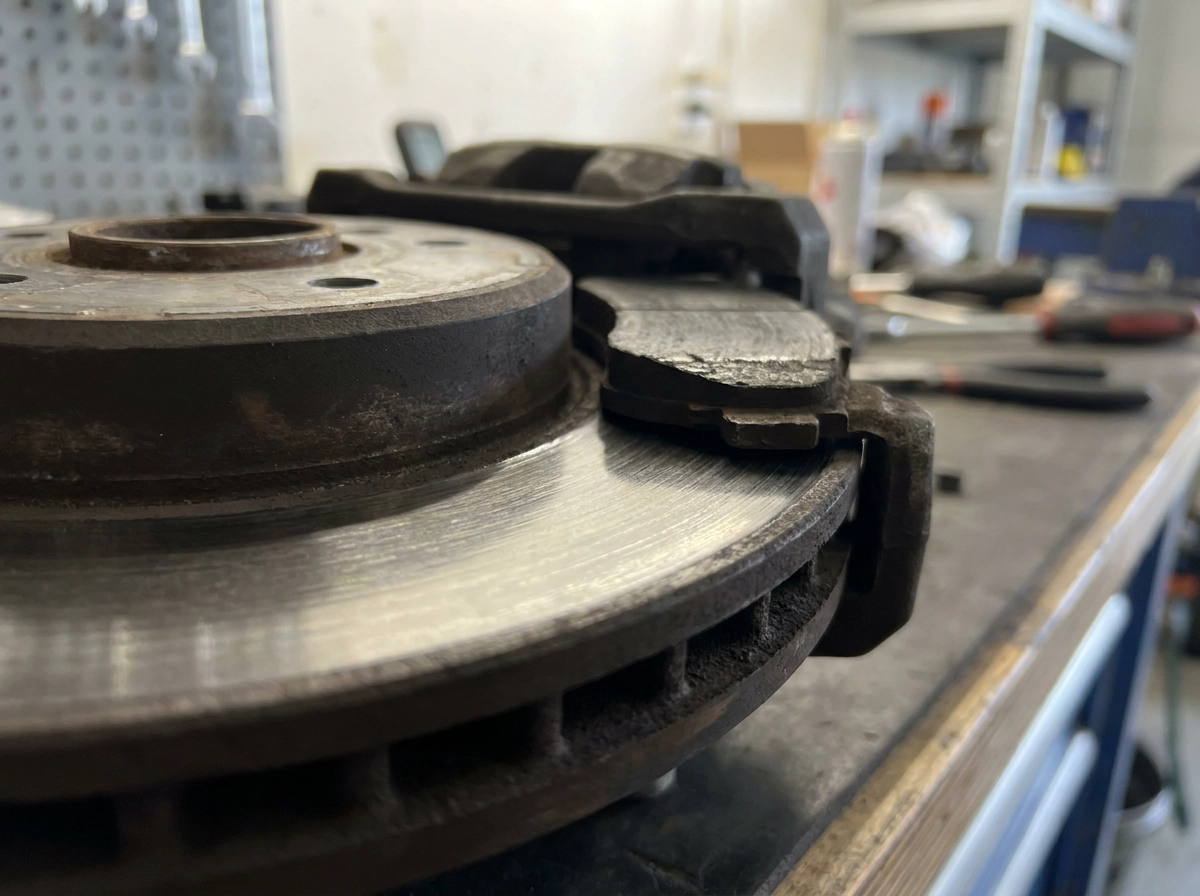
Disc diameter gives you a lever arm; how much of that ring the pad actually contacts is a separate decision, and it is the one that governs disc life. Pad sweep is the proportion of the friction ring covered by the pad. A typical target is 80 to 90 per cent of the annulus width. Fall short and you leave unswept bands at the inner and outer edges. Those bands run cooler, do not wear at the same rate as the swept surface, and become stress raisers: a common route to surface cracking and the judder owners then misdiagnose as warping, which in most cases traces back to overheating rather than a distorted disc (Jurid brake pad inspection manual).
Pad depth sets sweep, not piston count. Six pistons clamping a short pad cover no more of a 355 mm ring than four pistons clamping the same pad. Before you assume a bigger caliper uses your disc properly, compare the pad’s radial depth against the disc annulus width and confirm the caliper body will not foul the bell or hub.
Taper wear is a sizing symptom as much as a pad fault. Differential piston diameters and caliper flex load the leading edge harder, so pad thickness should be checked across the face, not just at the middle. Where the caliper design allows, swap pads side to side or inside to outside to even out consumption, and use thickness gauges rather than the wear sensor alone so you catch a taper before it reaches the backing plate.
Running cost follows compound and thickness. A track pad carrying 18 to 20 mm of material and a high temperature window often works out cheaper per track day than a road pad cooked every session, which is why carrying a spare set to events is normal practice rather than pessimism.
Finally, bedding in is not optional. A proper bed-in procedure deposits a transfer layer on the disc; skip it and you get the glazing and judder that send people shopping for a kit they did not need. Get sweep, pad spec and bedding right, then move on to whether the assembly physically fits behind your wheels.
How to Measure Wheel Clearance Before You Order
Pad sweep and compound settle what the disc has to do. The next constraint is physical: whether the caliper and disc fit inside your wheels at all.
Start at the hub face. With the wheel off, measure from the wheel mounting face to the closest point of the spokes in the plane where the caliper body will sit. That measurement, not disc diameter, is your first hard clearance limit. A large disc with a shallow caliper can fit where a smaller disc with a deep body will not.
Then measure the inner barrel. The caliper bridge has to pass through the wheel’s barrel, so check internal diameter at the relevant depth. Mesh and multi-spoke designs lose space quickly, and a spoke that looks clear at the face can foul further in.
Use a physical template where the caliper supplier provides one. Print it at 100 percent scale, cut it out, offer it up at the hub, then refit the wheel and check clearance with the suspension loaded. That is when the geometry actually gets tight, because camber and compression move the wheel relative to the caliper. If you are changing ride height or camber at the same time, read Wheel Alignment Explained: Camber, Toe and Caster Setup for UK Road and Track Cars first, because alignment changes where the wheel sits relative to the caliper.
Allow real running clearance, not zero. Calipers and discs expand when hot, tyre sidewalls deflect under cornering, and balance weights near the caliper can foul. A few millimetres of static clearance is not much when the parts are at temperature.
Repeat the check with the suspension loaded and the wheels turned to both full lock positions. Confirm the bleed screw orientation still allows clean bleeding with the caliper mounted, because a caliper that fits but cannot be bled is not fitted.
Performance Cars Parts sells brakes, suspension and wheel related upgrades online and answers fitment queries by email and WhatsApp, which is a useful second check. The final measurement is yours to make.
Spacer, Offset and Unsprung Weight Maths: A Worked Example
With those measurements in hand, run the arithmetic before you order anything. Take an illustrative example: an 18×8 wheel at ET45 on a hub where you measure 52 mm from the mounting face to the closest spoke, and a caliper template showing 58 mm from the mounting face to the widest point of the body. Add a 3 mm running allowance to the caliper figure, so you need 61 mm. At 52 mm you are 9 mm short.
The fix is a hub centric spacer, not a shim. A 10 mm spacer moves the wheel outboard and adds 10 mm of spoke clearance, taking you to 62 mm against the 61 mm requirement. A shim or a non hub centric spacer introduces runout and vibration you will later blame on the brakes.
Then accept the side effects. A 10 mm spacer turns ET45 into ET35, widens track by 20 mm per axle, shifts scrub radius by 10 mm and pushes the tyre closer to the arch. Check arch clearance and tyre coverage at full compression, not just at rest, and confirm the tyre still sits within the bodywork as you use the car.
Fasteners and mass come next. A 10 mm spacer usually needs longer studs or bolts; aim for full thread engagement to the wheel or spacer maker’s specification rather than counting turns loosely. In this example, an aluminium spacer of that size adds roughly half a kilogram per corner in unsprung, outboard mass, which is weight the suspension and wheel bearings carry.
Before you buy the spacer, price the alternatives. A wheel with a friendlier spoke profile or offset, a narrower caliper body, a smaller disc, or a different pad and cooling strategy can all solve the same clearance problem. Often the wheel change is the better value fix, especially if you are due a set anyway. If you are changing wheels, read Aftermarket Wheels: Complete Buyer’s Guide for UK Performance Cars before ordering.
MOT, Insurance and Resale With Non Standard Brakes
Once the wheel and spacer arithmetic checks out, the remaining costs are administrative.
MOT. The DVSA MOT inspection manual for private passenger and light commercial vehicles, section 1 Brakes, is the wording an inspector applies. It covers the condition and operation of service, secondary and parking brakes, ABS and brake fluid. A non-standard setup is not automatically a fail, but the manual decides what is accepted, so check the current version on GOV.UK before relying on any forum claim. Hydraulic lines matter as much as the brake caliper hardware. If you disturb them, replace corroded or badly routed pipe properly. A DVSA HGV rule treats a brake pipe with wall thickness reduced by more than a third as a major or dangerous deficiency; that rule is HGV only and does not apply to cars, but it is a reminder that inspectors judge condition.
Insurance. Declare every brake modification, including calipers, discs, pads, lines and spacers, and ask for written confirmation that each is noted. Premium effects vary by insurer, by the rest of your modification list and by how you use the car. An undisclosed brake change is exactly the kind of detail that can invalidate cover.
Resale. Keep the original calipers, discs, brackets and lines and refit them before selling to a road buyer. A track-focused big brake kit narrows the buyer pool even where it adds value to the right specialist, and provenance helps that sale. Plan the rear at the same time as the front: a front-only kit shifts bias forward and can make the car nervous in the wet. Keep receipts, kit part numbers, torque figures, pad compounds and a service record so the next owner can buy matching consumables. Our brake pads explained guide covers compound trade-offs if you are still specifying.
The Bottom Line: Buy by Measured Clearance, Not Disc Size
Wheel clearance decides the purchase, not the specification sheet optimist. Measure from the hub mounting face to the closest spoke in the plane where the caliper body sits, then check the inner barrel where the caliper bridge passes. Run the spacer and offset maths with your own numbers: if a template shows 58 mm of needed clearance and you measure 52 mm, a hub centric 10 mm spacer takes you to 62 mm, but it also turns ET45 into ET35 and shifts scrub radius. A 330 mm kit that fits and clears properly beats a larger kit you cannot bolt on.
Matching a brake caliper to your car is next. Total piston area has to suit your master cylinder bore, or you trade pedal travel for stopping power. Check pad depth against the disc annulus width: 80 to 90 percent sweep is a normal target, and low sweep leaves bands that crack. Then weigh the cost, unsprung and rotating mass at every corner, every lap.
Buy last. Fresh fluid, track pads and cooling come first. When you buy, choose by use case and measured clearance, declare the fitment to your insurer, and keep the standard parts for resale.
Conclusion
The right big brake kit is the one that fits, balances and can be lived with. Measure wheel clearance at the hub face and inner barrel before you compare disc sizes. Match total piston area to your master cylinder and check pad sweep against the disc annulus so you do not trade pedal feel for headline stopping power. Buy after fresh fluid, track pads and cooling; declare the fitment to your insurer and keep standard parts and records for resale. Your next step is practical: run the clearance and spacer maths with your own wheel, then use our brake pads explained guide to settle compound choice before ordering. Measure twice, order once, and build a track car that stops as well as it goes.
Shop related performance parts

Explore related products



Always check the individual product listing for your vehicle and engine before ordering.